Skyjacker
Rock Ready 6" Lift Install
See install
gallery for install pics
The
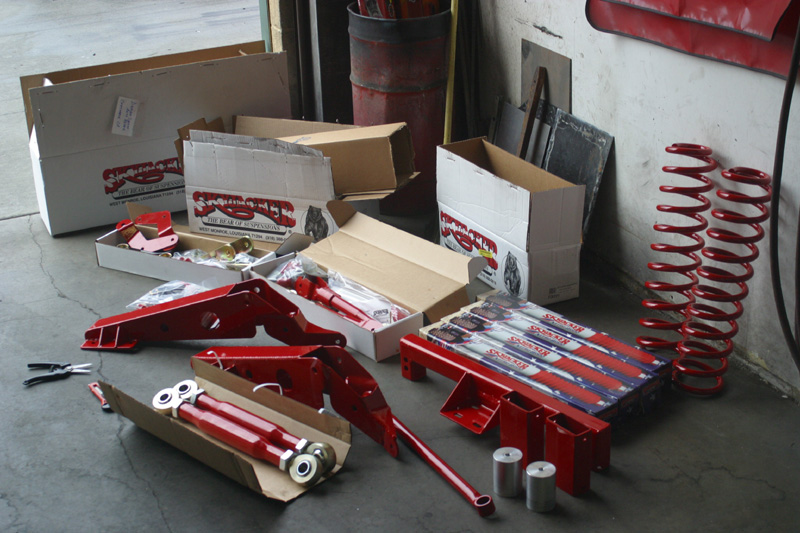
Skyjacker Lift System is quite a complex lift. Mine was shipped on a palet
and just opening all the boxes and sorting the components took some time.
My friend Damian helped me with the install. Another pair of hands would
come in handy…
Following the included instructions we started with the front end. First
we jacked up the truck, placed jack stands under the frame and removed the
tires. The instructions advise to put stands under the frame just behind
the front bumper since the space along the frame behind the wheels will
be needed for mounting the subframe. |
 |
Then we took off the brake calipers
so we could drop the axle as low as possible (we did the brakelines last). The
swaybar connectors and shocks were removed first and then we unbolted the lower
control arms. The instructions explained which stock bolts were to keep, but
we collected all original bolts, washers and nuts - just in case.
We removed the stock track bar and added the bushings to the new track bar to
be installed at a later point.
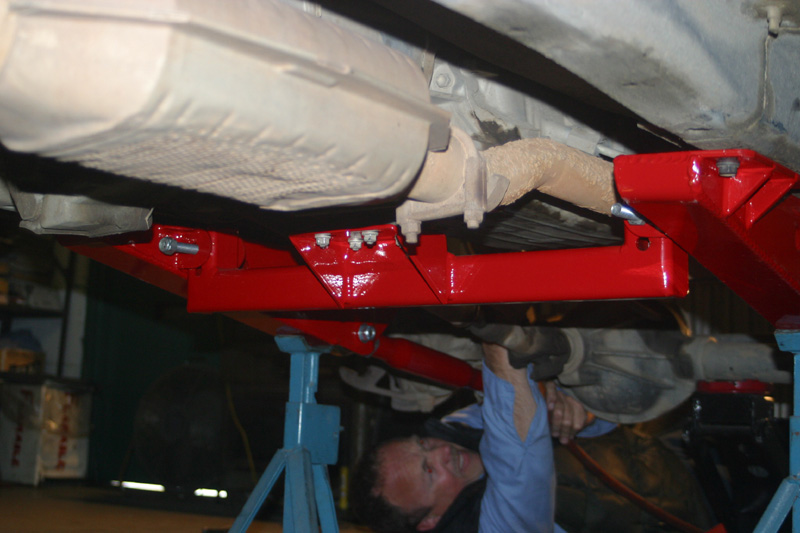
| Then
we had to use a jack to support the transmission so we could drop the transmission
crossmember. We mounted the two subframes but didn't tighten the bolts.
(We actually didn't tighten any bolts until all components were in place.)
The Skyjacker crossmember was put inbetween the two subframes and the transmission
was ready to rest on this crossmember. I chose the upper mounting holes
on the crossmember so the driveshaft angle would not be too steep. |
 |
After the installation of the Skyjacker
Slip Yoke Eliminator Kit and a new CV Driveshaft I will raise the crossmember.
We preassembled all control arms by making sure they were adjusted to the right
length and adding the stepped spacers. We attached the lower control arms to
the subframe and the axle. Now it was time to remove the upper control arms
and bolt the new control arm bracket into place. The upper control arms were
installed.
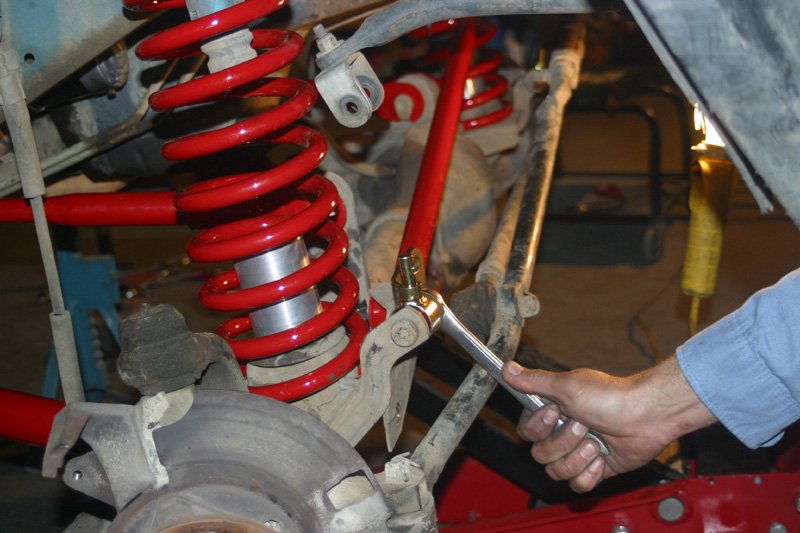
At this point we were ready to work on the coil spring. We drilled a hole into
the spring base to attach the aluminum blocks for the bump stops. Against the
instructions we chose not to mount them yet. We inserted them into the coil
springs and put the spring in place with the blocks held inside the springs.
This way we would not have to compress the springs so far to slip over the mounted
blocks. Once the springs were in place and fixed we bolted the aluminum blocks
to the spring base.
Now
we assembled the swaybar disconnects and installed the lower parts on each
side.
We mounted the new track bar bracket to the swaybar connector bolt and added
the track bar. The upper swaybar connector brackets were swapped with the
new ones and the rest of the quick disconnects were installed. We were ready
to install the new Skyjacker Nitro Shocks. |
 |
My lift system was sent without
the pitman arm because it was on backorder. I decided to start the install without
it and would add the pitman arm as soon as possible.
The steering stabilizer was put in place but since we were lacking the new pitman
arm the steering would not work properly. The drag link was hitting the swaybar
connector when turning the wheel to the right. We removed the drag link and
heated it up so we could slightly bend it. This way it would pass the swaybar
connector. After removing the old break lines and inserting the new longer lines
we tightened all the bolts, and the front end was ready. Now the tires had to
be realigned to make the truck drivable.
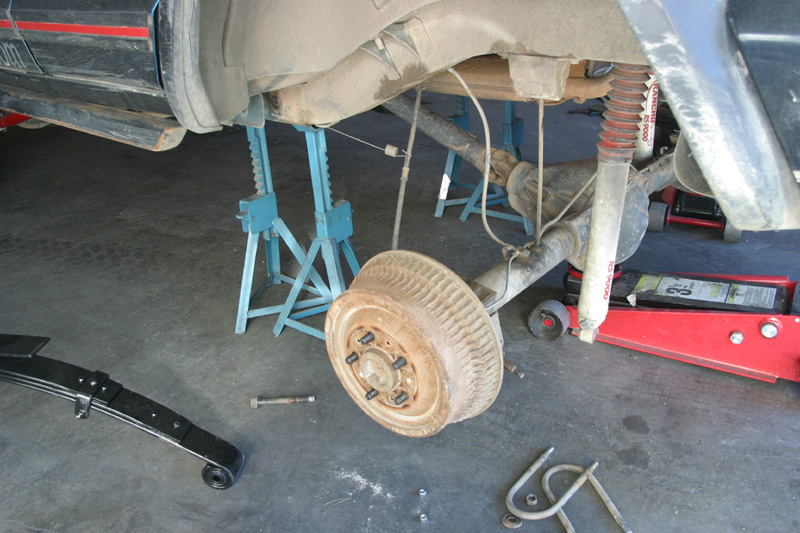
The
rear lift is pretty self-explanatory…
We jacked up the rear end, put jack stands under the frame and positioned
one jack below the differential to control the height of the axle. We lowered
the differential to relieve the tension of the leaf springs and removed
the leaf spring packs, shackels and the shocks. We assempled the new shackels
with bushings. I took the 2 degree shims off the old spring pack and disassembled
the Skyjacker Spring Pack to add this shim to point the differential towards
the transfer case. |
 |
Then we attached the Skyjacker Spring
Packs on one side to the frame and the shackel to the other side. We positioned
the axle relocation plates to move the axle forward by ¾". This
prevents the 33" tires from rubbing against the fenders in the back although
some fender flair trimming has to be done. We used the new U-bolts to mount
the axle to the springs. I ordered the rear shocks shorter (for a 3" lift).
We cut off the original shock mounts shortened them and relocated them. With
the newly tilted axle the shock mounts would not be level with the ground (on
one side the shock is attached to the front, on the other side to the back of
the axle). Now we added the new Skyjacker Nitro Shocks and bump stops. Finally
we installed the new longer breakline for the rear axle. The last thing to do
was to check the break fluid and get the air out of the break lines.
On my vehicle the exhaust pipe was too close to the rear shackel of the leaf
spring, so we heated it up and bent it to stay clear in case of shackel movement.
After receiving the Skyjacker Pitman
Arm I made another trip to my friend shop. We removed the old part to be replaced
by the new pitman arm. Now the lift was completely installed.
Before mounting the 33" tires
the fenders needed a little trimming. Following an old Skyjacker article (I
think it was published in a JP Magazine) we cut off the lower ends of the fenders.